Tools for digital marketing aren’t hard to find. The industry is constantly expanding and littered with software applications claiming to boost sales, user engagement, and email lists with little investment on your part. These claims are easy to make and extremely difficult to follow through on. After all, if it were so simple to design effective digital marketing solutions, everyone would just do it themselves.
There are some companies that have found a balance between usefulness and accessibility by creating low-cost, brand-building products. We think SumoMe – a company that builds lead-gen software for businesses on the web – is a prime example of one. SumoMe has packed several free “apps” into its interface, including a list builder (for email marketing), heat map feature, and social share tracker, among others!
SumoMe’s lead-generation products are extremely simple to use, and the clean, crisp presentation on their own website gives a good indication of how useful the tools can be on yours. Let’s take a look at some of the most effective ways to leverage the SumoMe line of products for digital marketing success on your company’s website.
Follow Along with This Post & Get Sumome’s 12+ Digital Marketing Tools for Free Here.
Getting Started
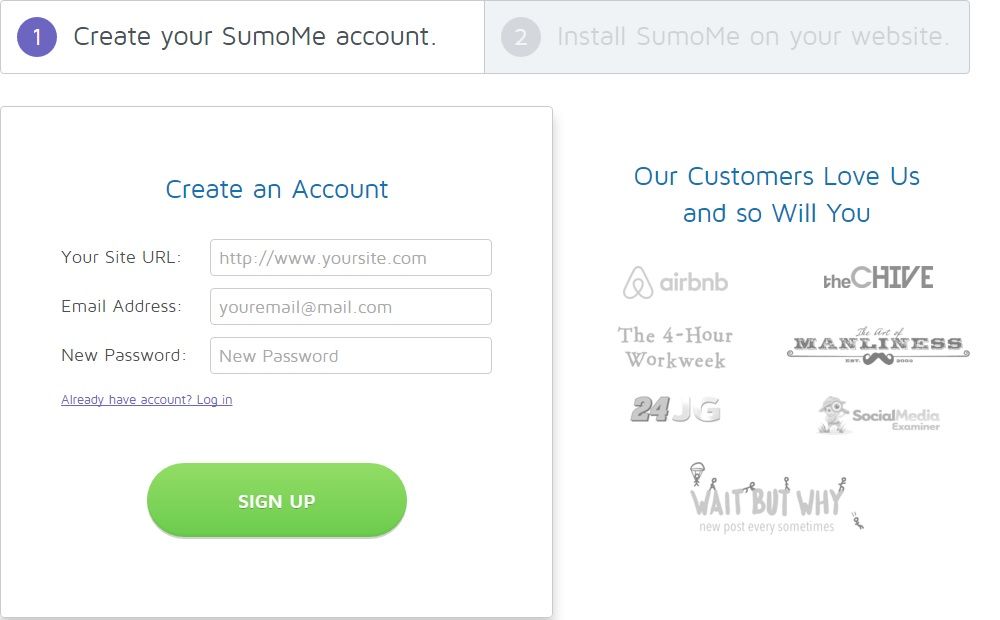
Getting started with SumoMe is quick and simple; their menus are shown below. First, you’ll have to create an account to link the application to your site (Or start from here).
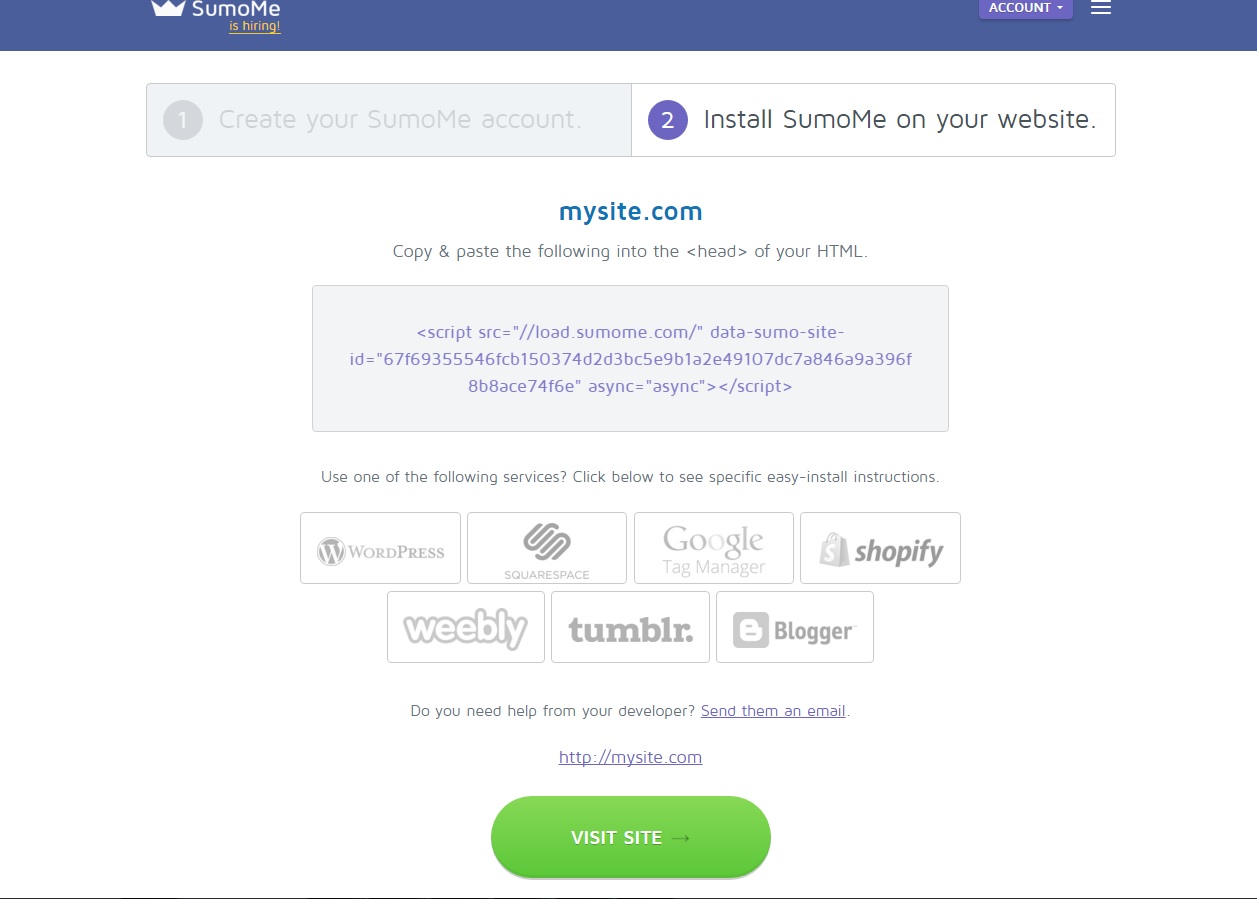
The required form fields are kept to an absolute minimum: just your site’s URL, your email address, and a password to log in with in the future. Next, SumoMe will provide you with a snippet of HTML code that needs to be embedded in your site.
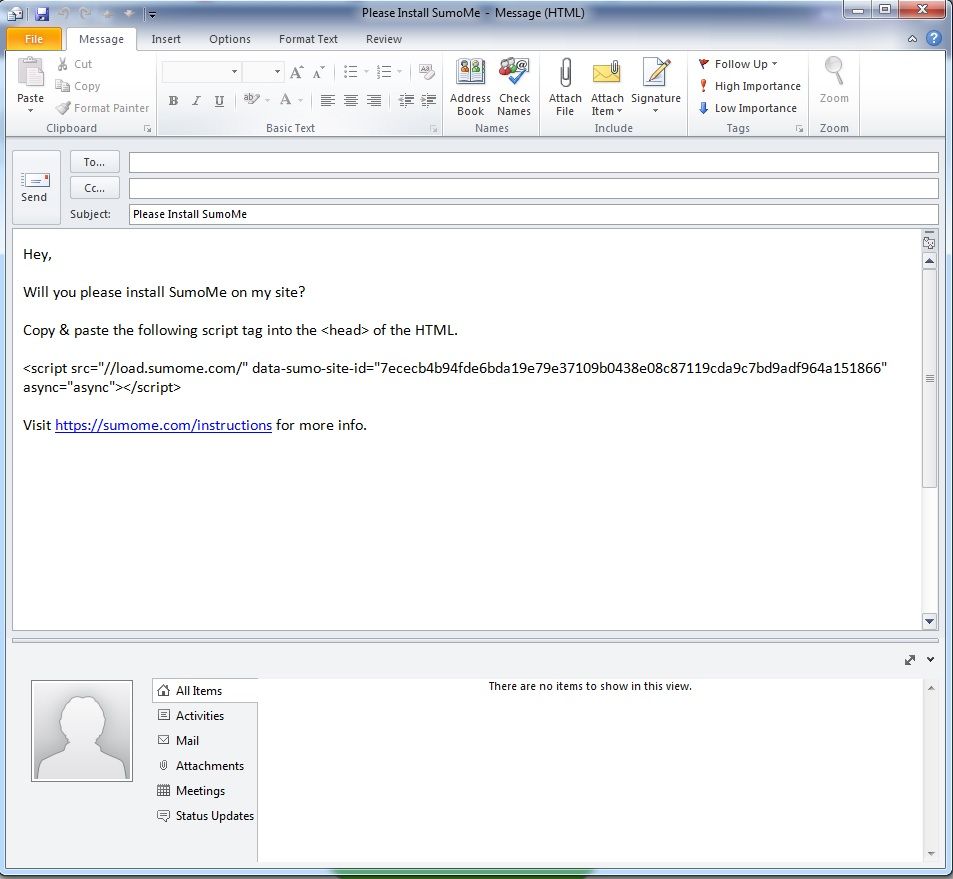
If your website was built with a content management system (CMS) like WordPress or Squarespace, you can click on links to those portals for instructions on each application. Otherwise, just copy and paste the code shown above into the “<head>” section of your site’s HTML code. If you have any questions for your developer on how to best incorporate the software, SumoMe provides a link that will automatically populate an email from your default service (for us, Microsoft Outlook) with a request for guidance.
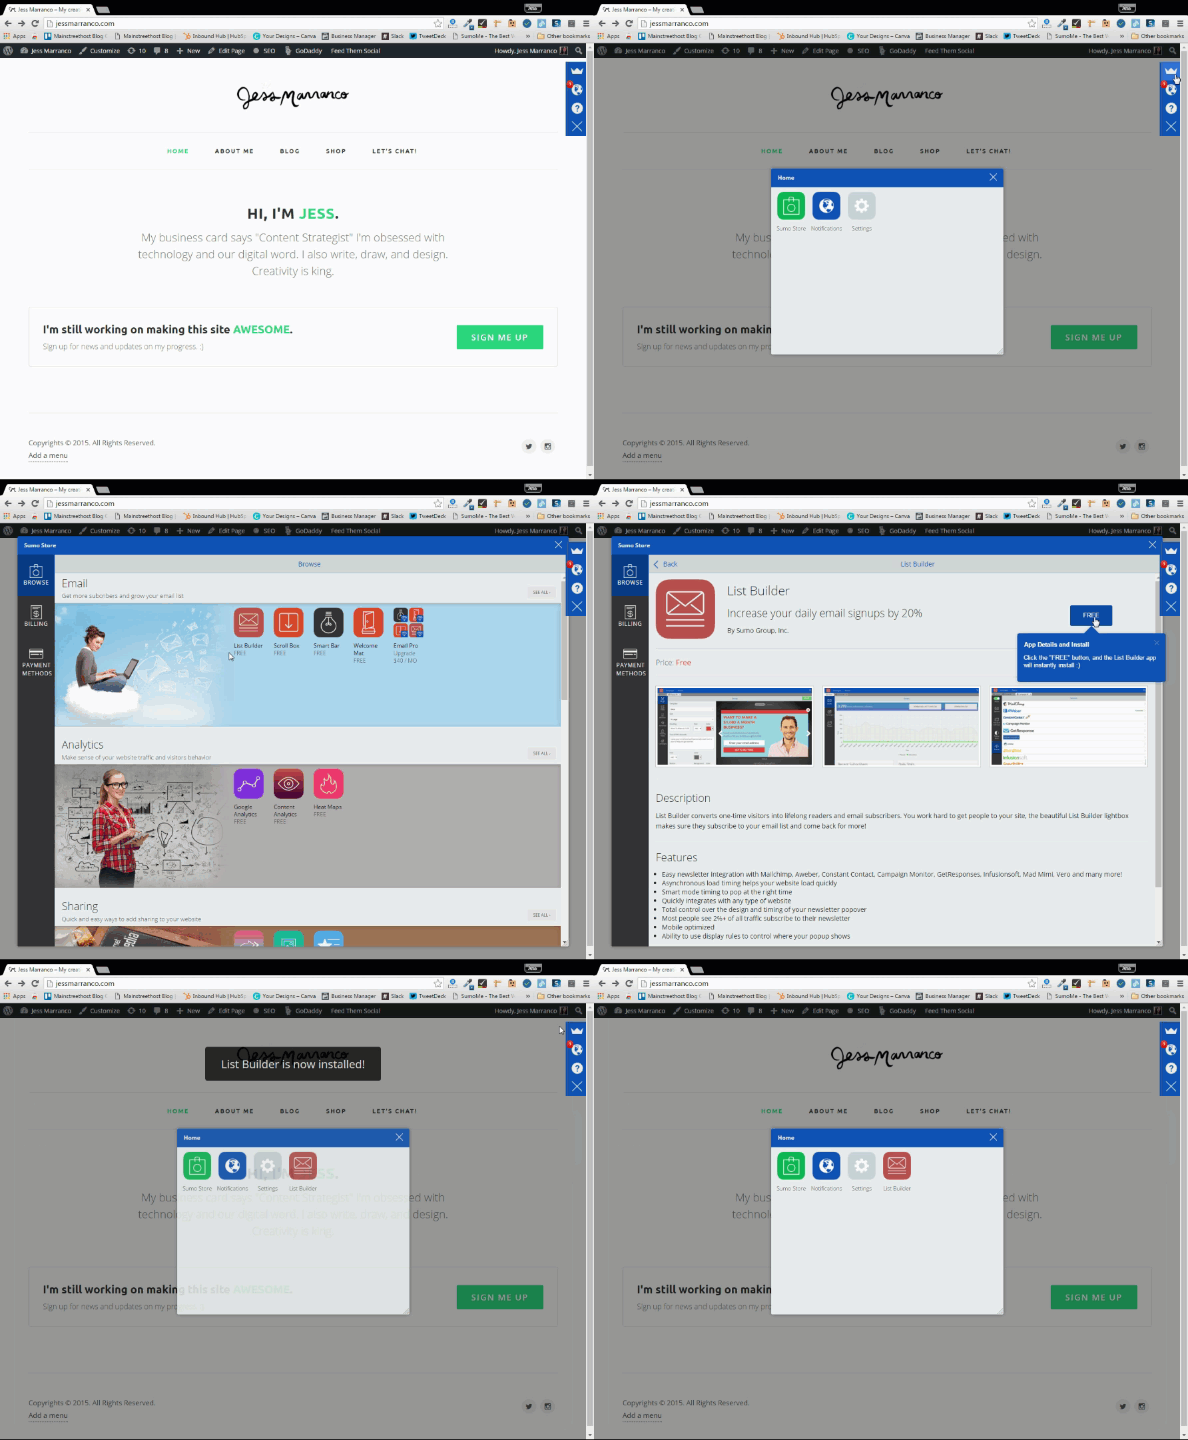
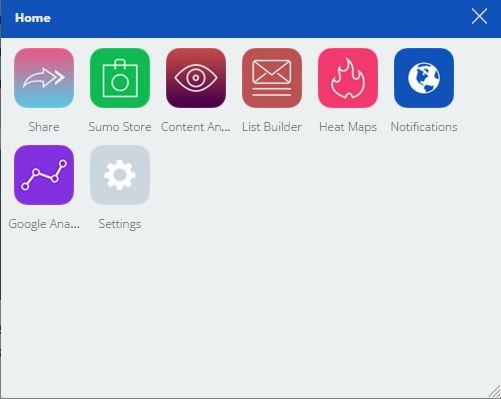
Now that you’ve created an account and installed SumoMe, you’ll want to dig a little deeper and get comfortable with some of the basic tools of the software. From any page on your site on which the SumoMe code is installed (which will typically be your entire website), you’ll see a vertical menu sticking to the right side of your monitor. If you click on the top option, an icon of a crown, you’ll be shown all of the different apps within SumoMe that you currently have access to.
Quick Tip: If you don’t see that vertical menu, simply type out “SumoMe” followed by the ↑ key, and it will appear.
Initially, you won’t have any apps installed, so your Home screen will only show the Sumo Store, Notifications, and Settings. Luckily, installing the first few apps that you’ll want to use is super fast and easy. As shown in the GIF below, just use the Sumo Store.
Getting Started With The Share Tool
One of the first things you should check out is the Share tool. With it, you’ll be able to monitor and tweak the button-based sharing capabilities that are now installed on your site. These include social platforms like Facebook, Twitter, and Pinterest. Once you click “Share,” you’ll see a menu with tabs descending vertically down the left side of the window.
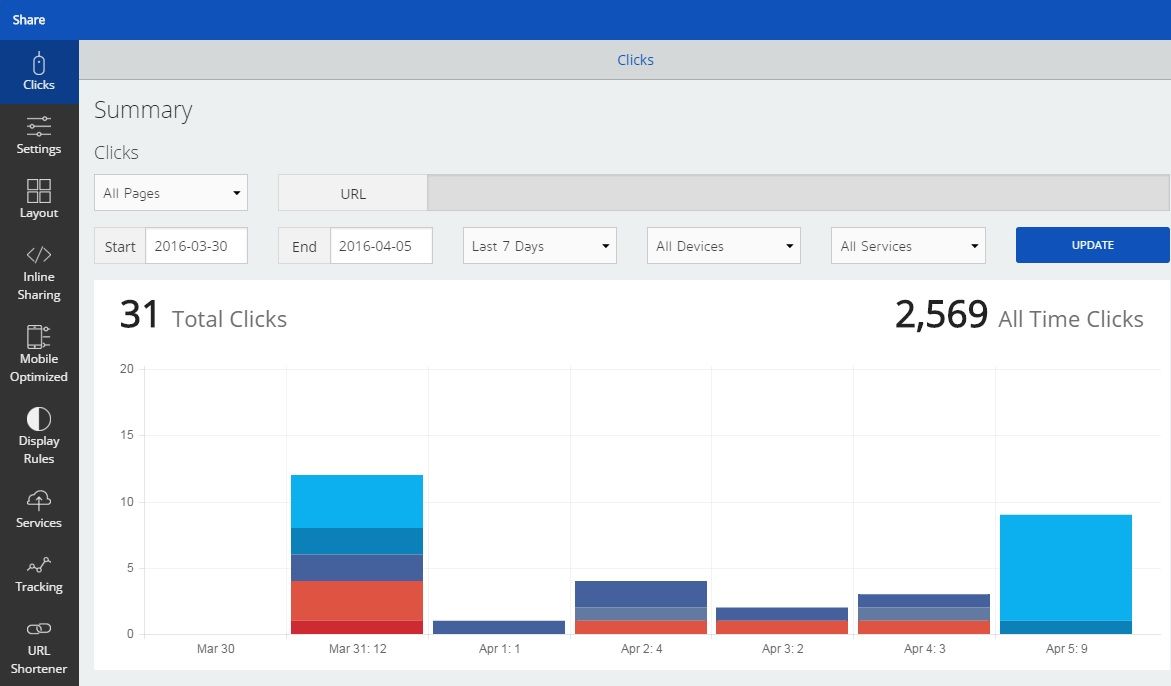
The Tab You’ll See Open First Is “Clicks.”
This graph represents all of the different times users have clicked on a share button on a given page. The clicks are split up by platform (Twitter, Facebook, LinkedIn, etc.) and by date, so you can see how and when people were using the SumoMe buttons to share your content. The different colors in the above bar graph represent different social platforms that you’ve chosen.
Note for free users: The share analytics are limited to a 7-day scope for free users. If you’re interested in seeing how a particular post is performing on a larger scale (and you should be), Google Analytics is a a great place to start. Here’s a free tutorial if you’re new to it!
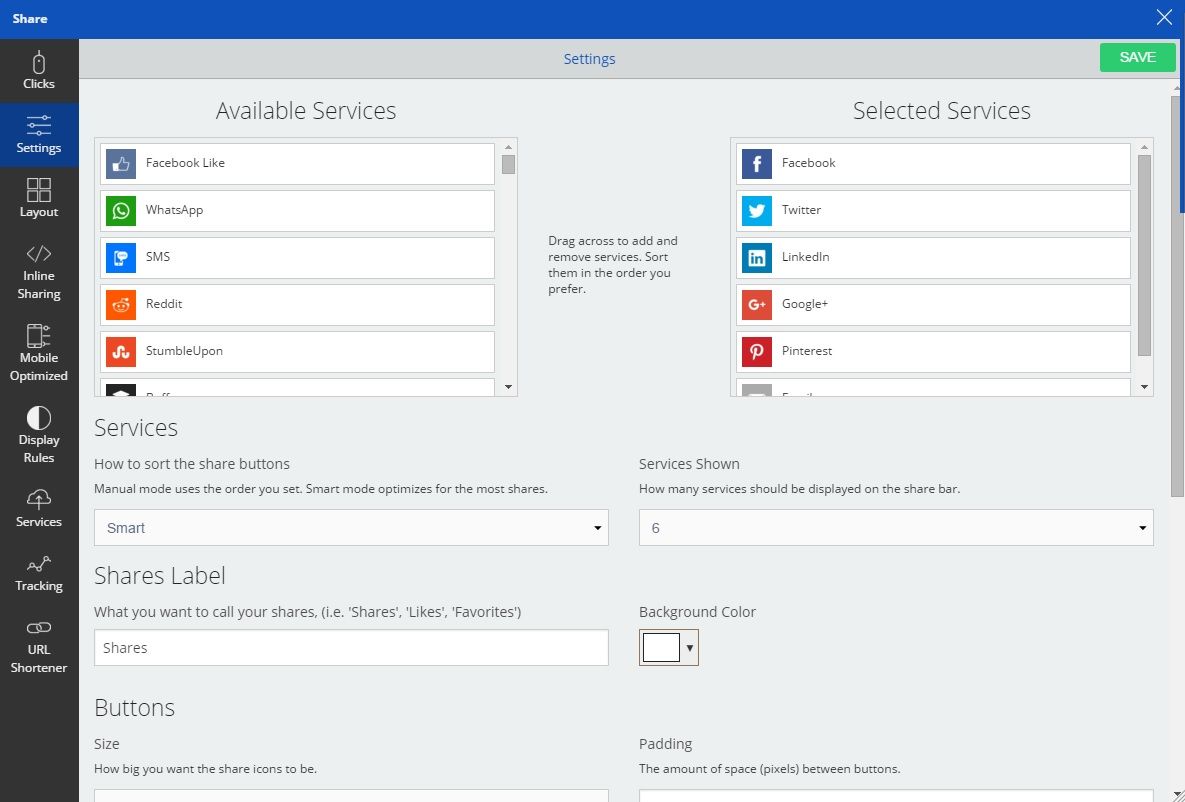
Next, You’ll Want to Take a Look at the “Settings” Section of Your “Share” Tab.
Here, you can set up the details of how your share buttons will function. First, decide which actions you want to track. As you can see on the right, we’re currently sticking with a fairly standard approach: Buffer, Facebook, Twitter, LinkedIn, Google+, Pinterest, and email. We found that these are the platforms our readers share to the most often. There are also options to include less obvious choices like Reddit and Flipboard. To choose one, drag the tab from “Available Services” to “Selected Services.” Below this, the settings options are self-explanatory.
We suggest sticking with “Smart” mode over “Manual,” as this will automatically optimize the order your buttons are listed for the highest possible engagement (If there are unique aspects of your site that make SumoMe’s method of optimizing less relevant, feel free to sort out the best order on your own).
Finally, choose your preferences for button size, shape, and color, and you’re all done with Settings. It’s a good idea to check back here frequently and make minor adjustments that can boost sharing performance of your pages.
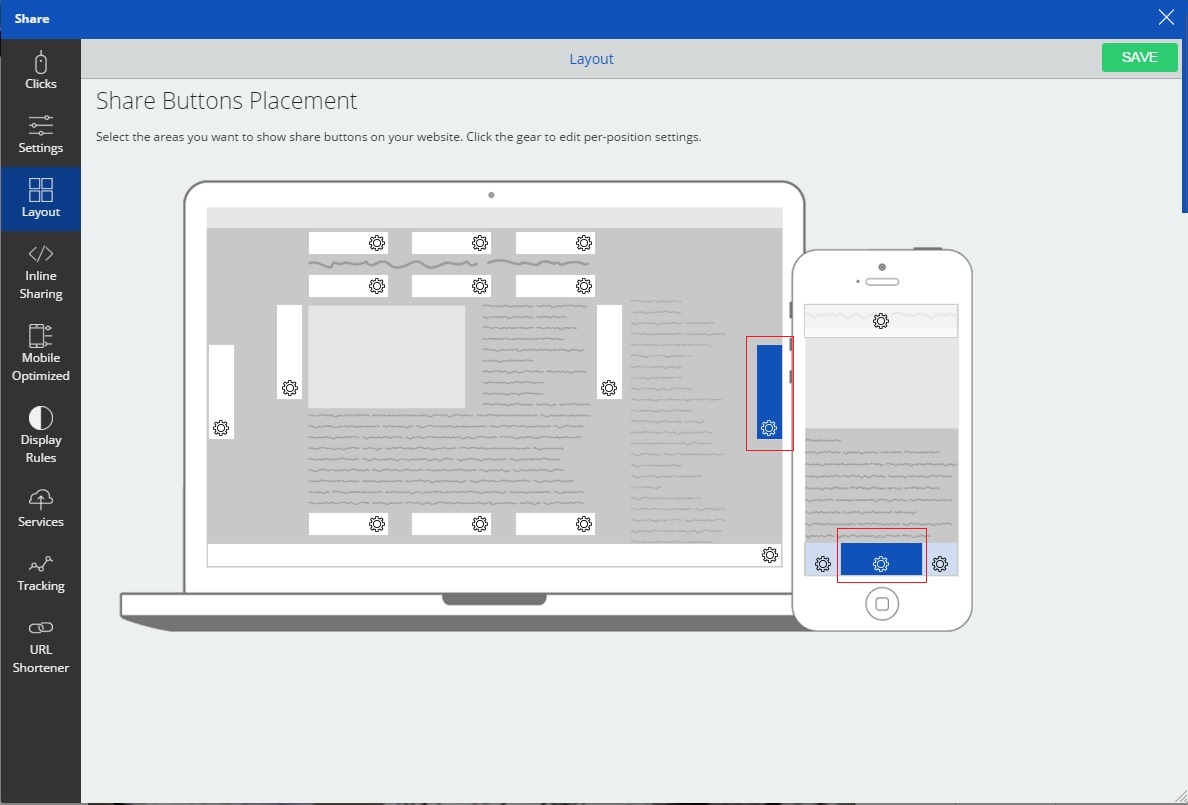
Next, Decide on Button Placement in the “Layout” Section.
Theoretically, SumoMe could’ve squeezed “Layout” into the “Settings” tab, as it is technically a setting. But we’re happy they didn’t; it’s great to see the layout options in large, to-scale images. Plus, with laptop and phone screens depicted, you can base your placement decisions on a realistic idea of what it will look like for your users.
We stack our buttons vertically, attach them to the right side of desktop screens, and attach them horizontally to the bottom of mobile screens. We think this makes sense for our blog based on the wider desktop text width and scrolling patterns shown by our mobile users. You may find your users’ behavior dictating a different arrangement – just be sure to think about their experience when making the decision.
Next Is The “Display Rules” Tab.
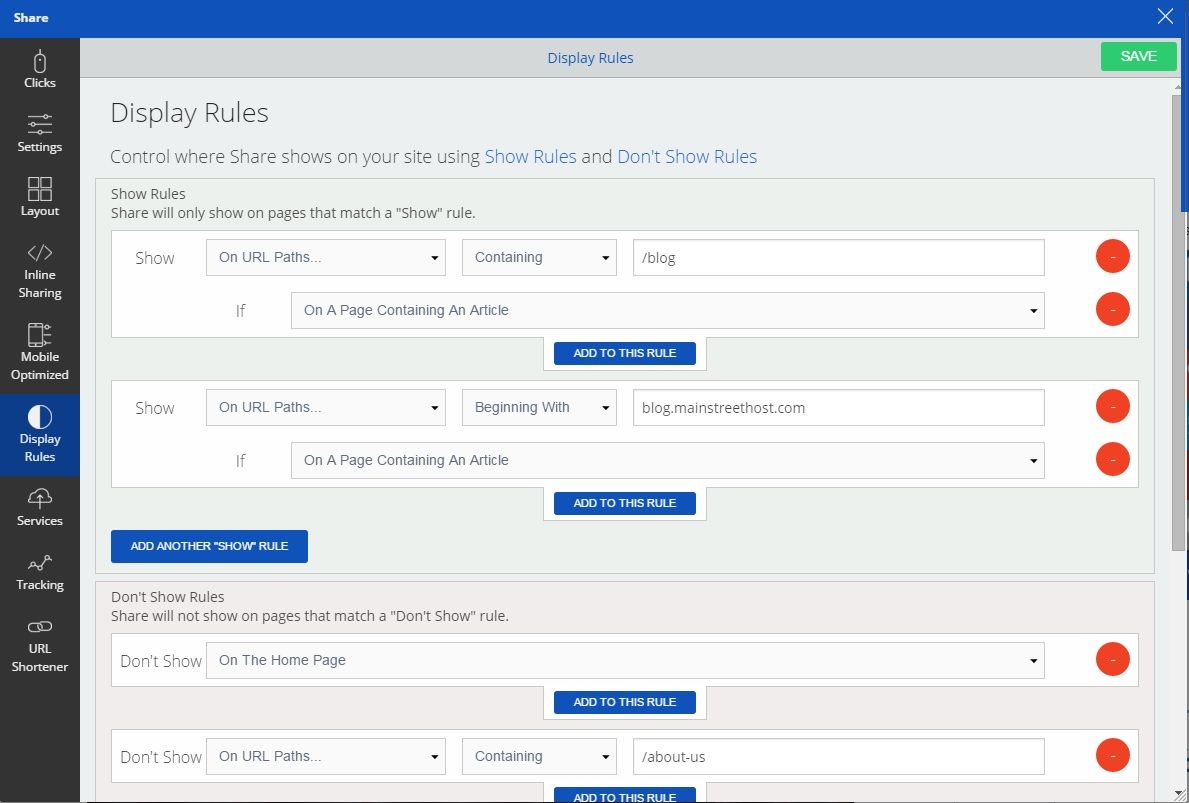
This is where you can decide which pages you’d like your share buttons to appear on. We’ve set up ours to appear on any URL paths containing the “/blog” text that signifies a blog post, because this is the most shareable site content for us.
For your site, there may be a more diverse range of content formats, and SumoMe allows for that flexibility. For example, you can set up display rules for pages based on query parameters, URL text format, and even device type.
That about does it for the Share tool. How you organize and leverage these buttons will go a great distance towards how well-shared your site’s content is. SumoMe’s greatest assets are its convenience and flexibility, so take a few minutes every day to make sure that you’re getting the best return on this investment as possible. After all – it’s free, so the only investment is time.
Using List Builder to Bolster Subscribers
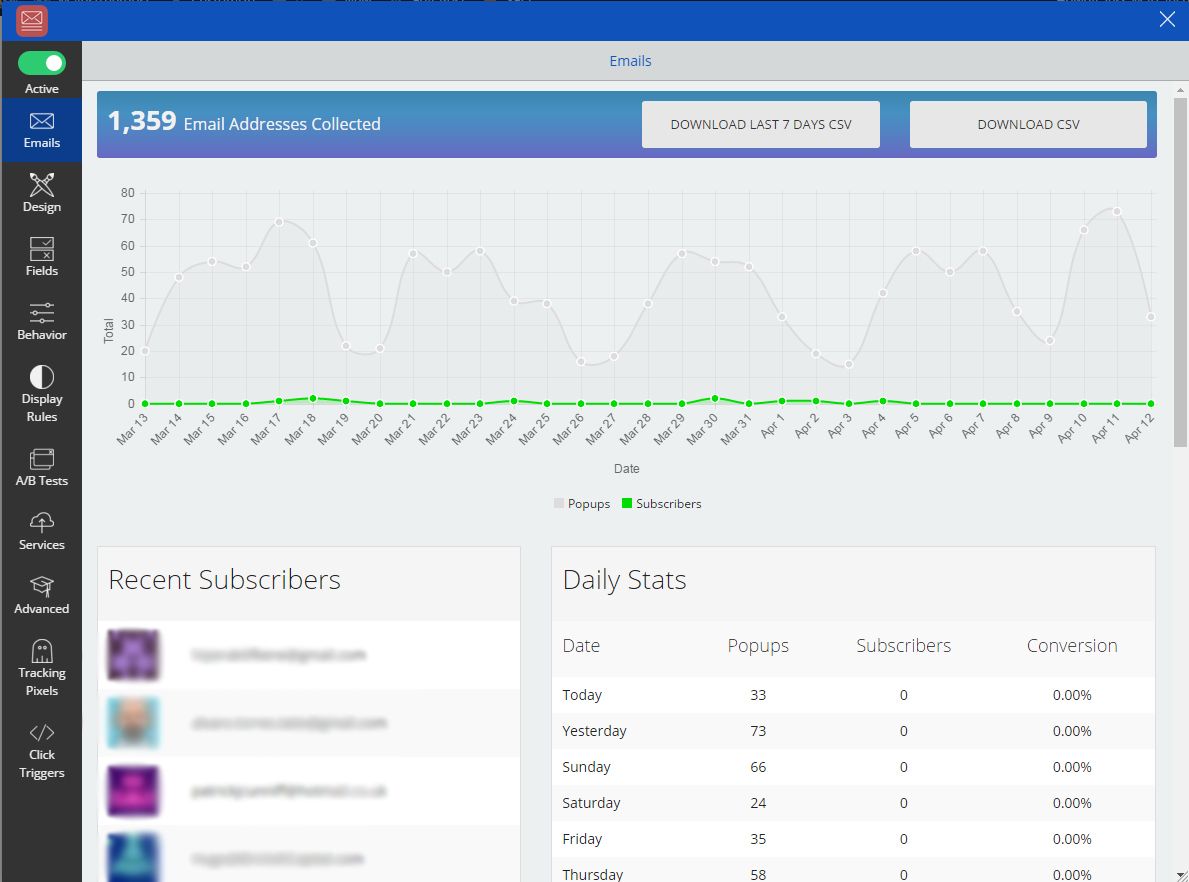
Next, we’ll take a look at the List Builder tool. List Builders are user-friendly pop-up CTAs aimed at – you guessed it – building your lists. Lists of what? Well, that’s up to you. For us, we’ve used this tool to boost our email subscriptions. So, naturally, the first tab within the List Builder we’ll take a look at is the “Emails” tab.
Here is a statistical overview of the emails we’ve accrued through our list builder thus far. The graph is particularly useful because it overlays the number of pop-ups shown to users over the actual number of converted subscribers. This way, you can get a sense of the tool’s reach and its efficacy all at once. Below that, you can see the email addresses of your most recent subscribers and check in on the stats of the day.
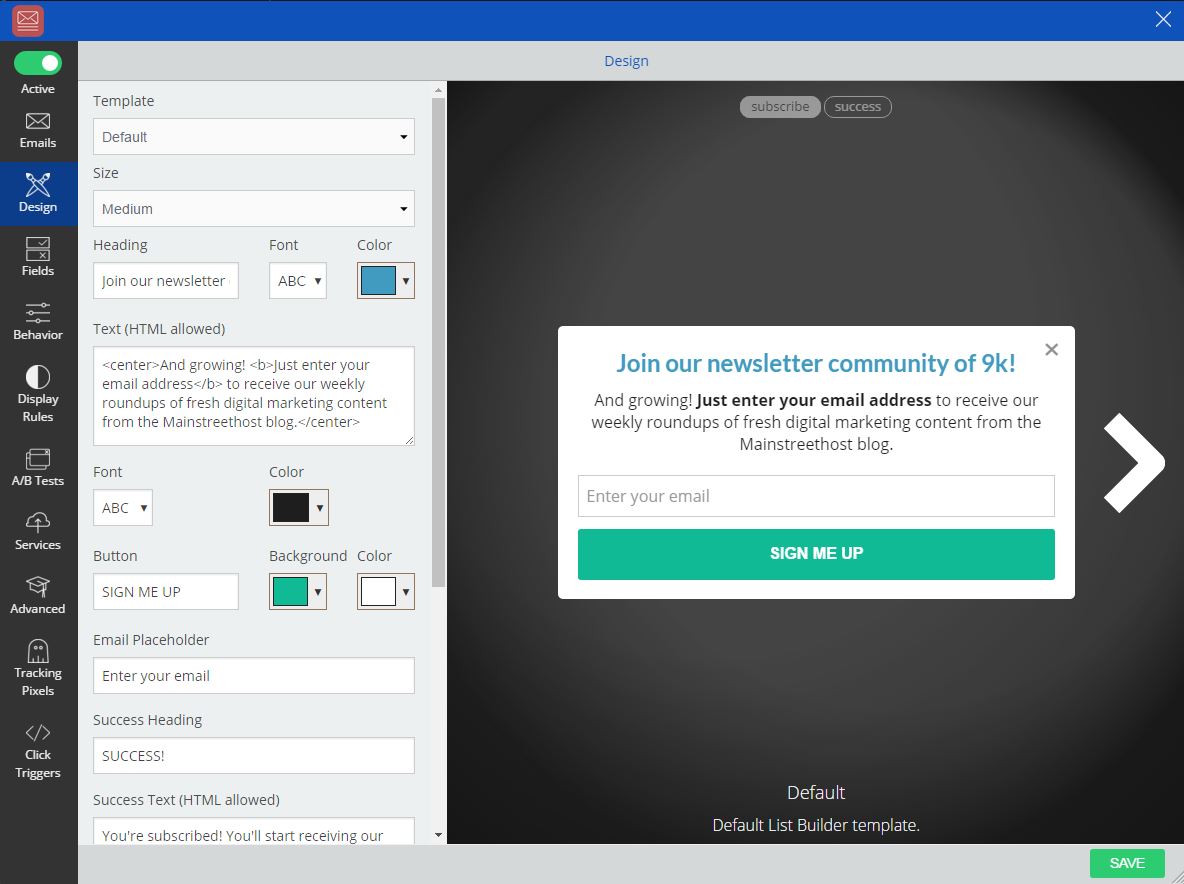
Next, we have the “Design” tab. This is where you’ll do the actual creative work of making your List Builder.
For unpaid users, there is currently only one template available, but that’s okay. If you’re just starting off with the software, you’ll want to get used to its basic functionality before getting too in-depth anyway. Besides, there’s plenty of customization to work on within that template. First, decide the size of the pop-up. We think medium is the best choice for us because it feels prominent without being overly pushy. Next, choose the color scheme for the pop-up. This is simple enough – go with the colors that are already incorporated into your brand.
Quick Tip: It’s also okay to throw in a splash of a new color as well – it will help the List Builder stick out on the page and attract the eyes of your users.
Finally, write the text. This writing should be persuasive, but not aggressively salesy. Keep in mind – users are only going to fill out a form field if they’re excited about the content they are getting in return, so focus on that.
Beyond these two, the remaining tabs for the List Builder tool are self-explanatory. “Display Rules” works in much the same way it did under the Share tool, “Behavior” is best kept on the Smart mode that lets SumoMe automatically optimize the determination for when your pop-up is displayed, and the rest of the tabs all require a SumoMe Pro upgrade.
The SumoMe Marketplace Offers Still More Possibilities
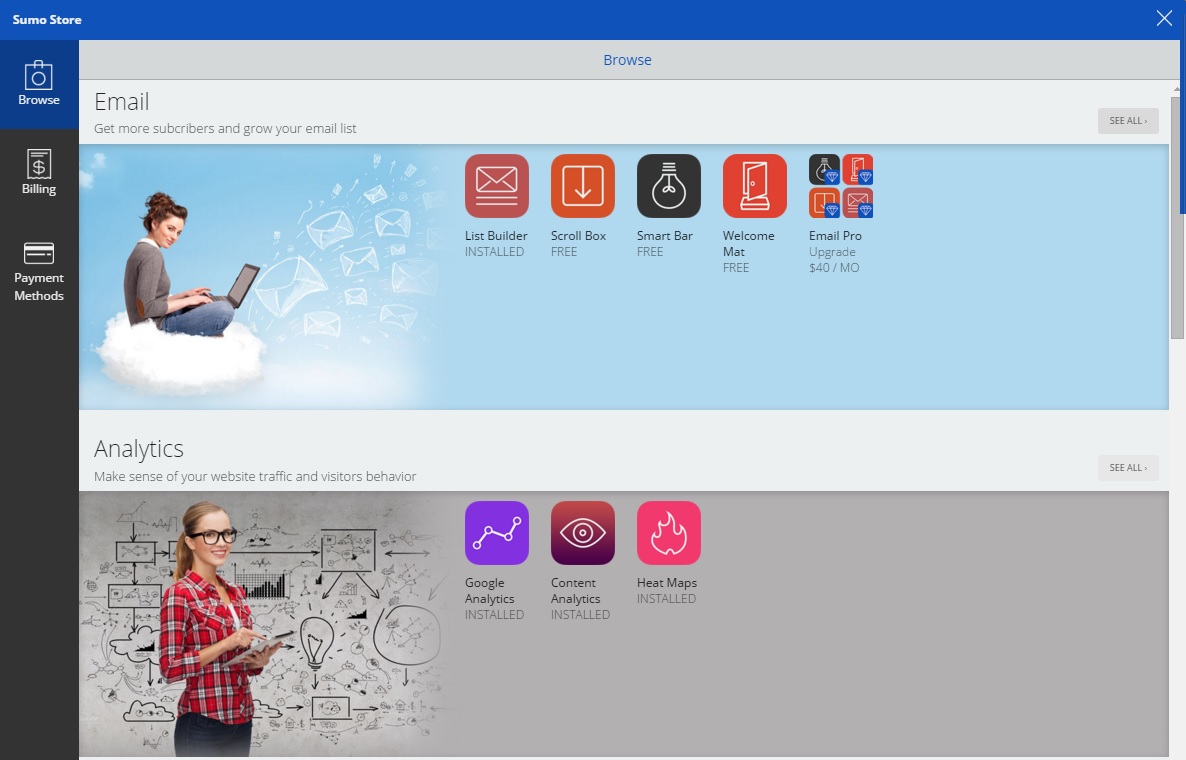
SumoMe serves not just as one or two tools, but as an entire marketplace for digital marketing tools. Beyond the two that we’ve shown so far in detail, there are many more available through the Sumo Store, shown below.
Here, you can purchase many more tools to fill your particular digital marketing needs. We think it’s best to master the tools featured in this post before expanding your horizons, but here’s a quick run-down of other great stuff you can explore through the Sumo Store when you’re ready.
- Heat Maps: Heat Maps are like nanny cams for your website. They’ll monitor the clicking and scrolling behavior of your users, and compile the aggregate data into a handy, easy-to-interpret interface. While the concept feels a little bit creepy, the benefits are too useful to ignore.
- Google Analytics: No, SumoMe didn’t invent Google Analytics. But they did create a portal tool for accessing your Google Analytics info without having to leave SumoMe. This can be hugely beneficial because it allows multiple streams of data to communicate with one another – ensuring that you’re making marketing decisions based on the most up-to-date information possible.
- Welcome Mat: Welcome Mats are full-page CTAs that feature clean imagery and a focused approach. You decide what action you want to incentivize: whether it’s getting more blog visits, promoting your newsletter, or highlighting a sale that’s being featured for a limited time only. The Welcome Mat interfaces are crisp and attractive – sleekness in design can strip a pop-up of its salesy connotations.
Another great aspect of Welcome Mat is that it can access the data from across all of SumoMe’s apps. This way, if someone visits the appointed page that had already adhered to the action being promoted by your Welcome Mat (subscribed to your blog, for instance), they won’t get confronted with a full page CTA telling them to do something they’ve already done.
Using pop-up ads in your digital marketing arsenal is a bit of double-edged sword. While the practice is hugely effective, it can be extremely annoying for users and drag down your site’s overall UX considerably. That’s why – if you do decide to use them – it’s vital to use them in a way that minimizes that annoyance as much as possible.
And there you have it. While this look at SumoMe’s tools and potential benefits is not exhaustive, it’s a good place to start. We hope the new tools help your contacts grow and get your content shared just like they did for us!


